
Hello fellow vector artists, I am a cartoonist/illustrator who specialized in retro style vector cartoons. You can find more of my work and books at my web site. In this tutorial, I'll show you how I use Adobe Illustrator to create vector cartoons.
Introduction
I am a freelance independent cartoonist specializing in vector based retro cartoons and character designs for magazines, skateboard deck designs, and packaging designs. I have a somewhat complicated process because I don't use strokes or brushes on most of my shapes. I prefer to have shapes sit on top of other shapes so that I can easily vary the line weights.
Final Image Preview
Below is the final image we will be working towards. Want access to the full Vector Source files and downloadable copies of every tutorial, including this one? JoinVector Plus for just 9$ a month. You can view the large version here.

Sketch
I start by scanning in the hand drawn sketch. I scan my images at 300 dpi and use levels to clean up the images. I usually sketch with Sanford Terra Cotta col-erase color pencils and tighten up the sketch with blue lead mechanical pencils.

Step 1
I start by importing the scanned image into a 7" by 8" CYMK Illustrator file. I color in CYMK because all my images are designed to be printed.

Step 2
I set the layer with the drawing to Template in the Layer Options palette. I then dim the image somewhere between 30 to 45%.

Step 3
After zooming in I Use the Pen Tool to trace a silhouette of each element of the figure. I set the Pen Tool to No Fill and a stroke of .25 pt. I usually work from background to foreground with my elements.

Step 4
Here I have traced the outline of the figures main body.

Step 5
Next I duplicate the shape and draw a slightly smaller shape inside the larger shape. The larger shape will act as an outline to the smaller shape. I think most artist usestrokes, but I don't like uniform lines around my shapes. I like them to have varied line weights.

Step 6
Since the left arm is in front of the rest of the body, I put it on its own layer.

Step 7
Next I use the Ellipse Tool to redraw the basketball. After making concentric circles, I use the Pen Tool to make the T shape of the basketball. I then increase the stroke to 4 pt. Then I used Expand under the Object menu to change the lines to shapes.

Step 8
The head and sweat band are also on their own layers, with the sweat band on top of the "head" layer. Areas of black like the hair and beard are made up of one shape not two.

Step 9
Next I trace the facial features.

Step 10
While tracing the uniform I use the "Haettenschweiler" font to duplicate the numbers.

Step 11
Here I added and traced the LeBron James logo.

Step 12
With the tracing complete, I switch the objects from Stroke to Fill. The white filled shapes are sitting on top of the black filled shapes. The black shapes act as outlines for the white shapes.

Step 13
Next I open up the Pantone palette and choose the base colors for the objects. I replace the white color in the object with the base colors.

Step 14
I replace most of my black lines with a dark shade of the base color. Here I used a darker version of the orange in the basketball.

Step 15
With the base coloring complete I next use gradients to add highlights to the objects.

Step 16
Here I have created a smaller circle within the basketball. I create a gradient with a lighter version of the base color blending to the base color. I organize my colors in color groups based on the objects like skin, clothing and in this case a basketball.

Step 17
Here I used a light yellow orange to add some reflected light to the basketball.

Step 18
I use the Pen Tool to create highlight shapes. As with the basketball, I blend a lighter color into the base color.

Step 19
I have found that the key to getting color to blend nicely in the gradients is to covert your colors from Spot colors to Process colors in the Swatch Options.

Step 20
I use the lighter color to add highlights where I think light would hit first.

Step 21
The image is almost complete. I add a couple of hard shadows to make some features pop. The shadows are darker than the base color, but lighter than outline color.
Step 22
Finally, I make a copy of all the layers onto one new layer behind all the other layers. I merge all the elements into one big silhouette. This is one of the few items I stroke to add a black outline around the entire image.

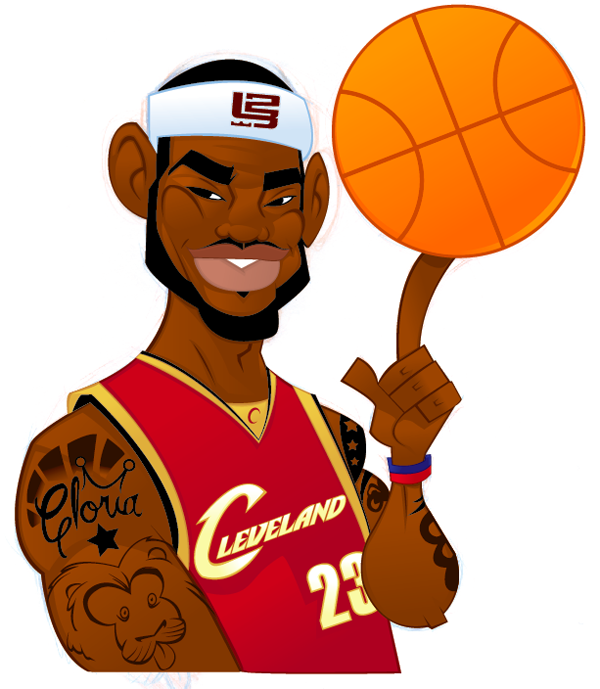
Final Image
The final image is below. You can view the large version here.

Subscribe to the Vectortuts+ RSS Feed to stay up to date with the latest vector tutorials and articles.
by.design.tutsplus.com


0 comments: